Picking the wrong tool for the job wastes time and money. A broken tool or a scrapped part is a frustrating setback. We have all been there before.
Drills1 are designed for plunging axially to create holes. End mills2 are designed for cutting sideways (radially) to create slots or pockets. Their geometry3, like flute design4 and cutting-edge placement, is specialized for these different forces, making one unsuitable for the other's primary job.
It seems simple on the surface. One goes down, and the other goes sideways. But the real "why" is in the engineering of these tools. Understanding their core design differences is the key to using them correctly and efficiently. Let's look deeper into what makes each tool unique and how that affects your work on the shop floor.
Why Is One Made for Plunging and the Other for Milling?
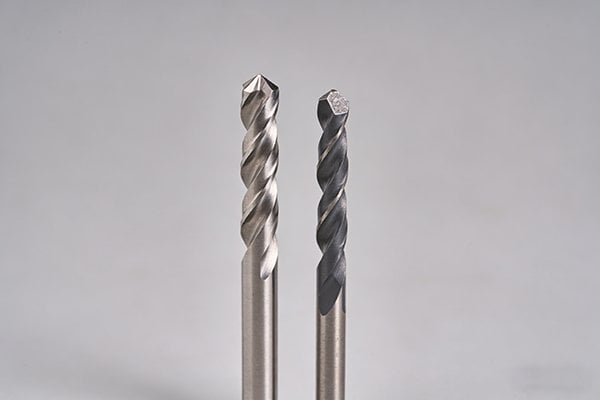
Have you ever looked at a drill and an end mill side-by-side? They look similar but are built for opposite jobs. Using them wrong can lead to poor results.
Drills1 are made for plunging because their point is designed to push material away from the center, efficiently creating a hole. End mills2 are for milling because their side flutes are designed to shear material with radial force5, creating profiles and pockets with precision.
The difference all comes down to their geometry3 and how they handle cutting forces6. A drill is built to withstand immense axial force7, which is the pressure of pushing straight down. An end mill is engineered to handle radial force5, which is the pressure from the side as it moves horizontally through the material.
I remember when I first started, I thought they were almost interchangeable. But I quickly learned that their designs are highly specialized. Let's break down the key differences.
Axial vs. Radial Design Focus
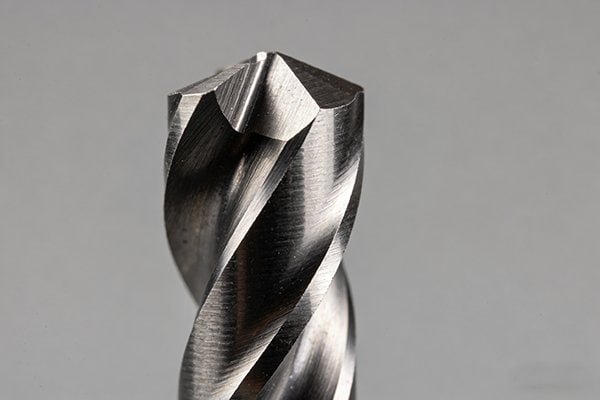
A drill's entire design is focused on the plunge.
- Point Angle: The tip, usually 118 or 135 degrees, is angled to center the tool and efficiently force chips out through the flutes as it pushes downward.
- Web Thickness: The central core of the drill is thickest at the shank and tapers toward the point, providing the necessary column strength to prevent it from buckling under axial load.
- Flutes: The large, deep flutes on a drill are like highways for chips to exit the hole. Their job is evacuation, not side-cutting.
An end mill, however, is built for the side load.
- Side Cutting Edges: The sharp flutes running along the side of the tool do the actual work. These are designed to shear material cleanly as the tool moves sideways.
- Core Diameter: The core of an end mill is generally thicker and more consistent along its cutting length to provide rigidity against bending and vibration during milling.
- End Face: The design of the end face determines if it can plunge at all, which we will discuss later.
| Feature | Carbide Drill Bit | Solid Carbide End Mill |
|---|---|---|
| Primary Force | Axial (Plunging) | Radial (Milling) |
| Key Geometry | Pointed tip (e.g., 135°) | Flat or shaped end face |
| Cutting Action | Pushes material from the center | Shears material with side flutes |
| Core Design | Tapered for column strength | Thick and consistent for rigidity |
What Happens if You Use a Drill for Milling?
You have a quick slot to make, and a drill is already in the chuck. It is tempting to just use it for a quick sideways cut. This is a common but very costly mistake.
Using a drill for milling will almost certainly cause it to snap. Drills1 have no side-cutting edges8 and are not designed to handle radial loads. The attempt will likely break the tool, damage your workpiece, and can be a serious safety hazard in the shop.
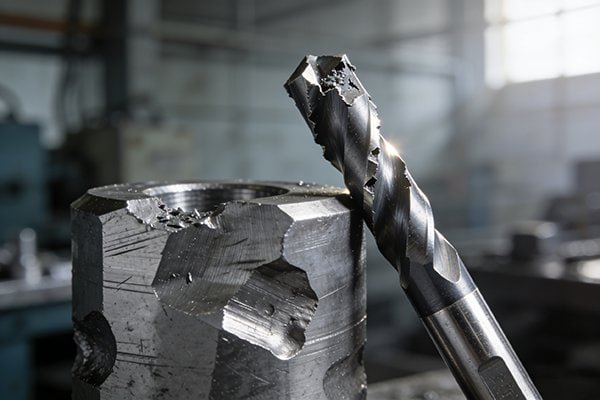
Thinking a drill can mill is a dangerous assumption. The tool's physics are completely wrong for the task. A drill bit is designed to spin and push forward, with its two main cutting lips at the very tip doing all the work. The spiral flutes are only there to pull chips out of the hole. They have no effective cutting geometry3 on their sides.
When you try to move a drill sideways against the material, you are not cutting. You are just pushing against the workpiece with the side of the tool. The immense radial force5 puts all the stress on the weakest part of the drill, which is usually right where the flutes end. I have seen it happen many times. The drill chatters violently for a second and then snaps. This not only ruins the tool but can also gouge the part beyond repair. It is a lesson you only want to learn once.
The Physics of Failure
Let's look at why this failure is so predictable.
- Lack of Side Cutting Edges: The helical flutes on a drill are not designed to shear material. Their edges are not sharp or positioned correctly for milling.
- Weak Core Structure for Radial Loads: A drill's web is designed for compression, not bending. Side forces cause it to flex and vibrate uncontrollably.
- Poor Chip Evacuation: Even if it could scrape some material away, the flutes are not designed to clear chips from a sideways path, leading to clogging and even more stress.
This is why we always insist on using the right tool for the job. Our solid carbide end mills9 are engineered with a thick core and sharp helical flutes specifically to handle these radial force5s smoothly and efficiently.
Can an End Mill Ever Actually Drill a Hole?
We have established that a drill cannot mill. So, what about the other way around? Can you use that end mill in your spindle to plunge a quick hole? This is a more complex question.
Yes, an end mill can drill a hole, but only if it is a "center-cutting" end mill. These tools have cutting edges8 that extend all the way to the center of the tool's face, allowing them to plunge straight down into the material like a drill.

This is a critical distinction that every machinist10 needs to understand. Not all end mills are created equal. If you look at the bottom of an end mill, you will see either a solid center or a small hole. This is the key to its plunging ability.
A non-center-cutting end mill11l](https://nv-tool.com/what-machining-problem-are-you-solving-a-guide-to-end-mill-selection/)%%%FOOTNOTE_REF_12%%% has a hole in the middle because its flutes do not meet at the exact center. If you try to plunge with this tool, the solid material at the center of your workpiece has nowhere to go. The tool will simply rub, generate a huge amount of heat and pressure, and ultimately fail. It cannot cut a path for itself. A center-cutting end mill12, on the other hand, can create its own path by cutting material right at its axis of rotation.
Center-Cutting vs. Non-Center-Cutting
Here is how to tell them apart and when to use them.
- Center-Cutting End Mills:
- Have two, three, or four flutes that meet at the center.
- Can be used to plunge, ramp, or drill a starting hole for a pocket.
- They are very versatile tools, common in job shops. We see a lot of demand for our 2-flute and 4-flute center-cutting end mill12s for this reason.
- Non-Center-Cutting End Mills:
- Have a small hole or gap at the center of the tool face.
- Cannot plunge straight down. They require a pre-drilled pilot hole13 or a helical/ramping entry path.
- Are often more rigid and can have more flutes (5, 6, or more), making them ideal for high-efficiency side milling and finishing operations where plunging is not needed.
| End Mill Type | Plunging Ability | Primary Use Case |
|---|---|---|
| Center-Cutting | Yes (Can plunge vertically) | General purpose milling, pocketing14, slotting15 |
| Non-Center-Cutting | No (Requires a pilot hole13) | High-speed side milling, finishing passes |
How Do Drills1 and End Mills Work Together as a Team?
Thinking of these tools as rivals is the wrong approach. You get the best results when you see them as a team. Using them in sequence can make your machining faster and more efficient.
Drills1 and end mills work perfectly together. A drill efficiently plunges to create a pilot hole13. Then, an end mill enters that hole to begin its milling operations, like creating a pocket or slot, without the stress of plunging into solid material.
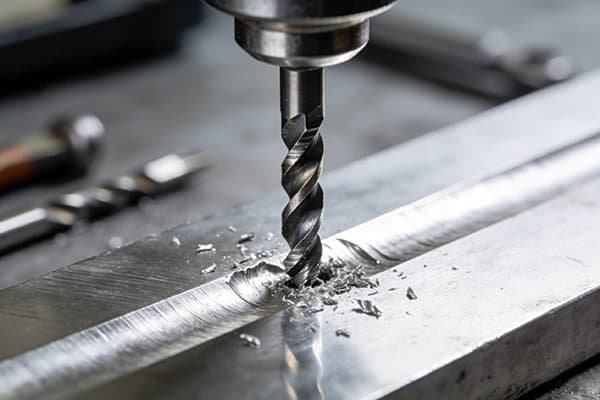
This two-step process is a fundamental strategy in CNC machining16. It plays to the strengths of each tool. The drill does what it does best: create a hole quickly and effectively. The end mill then takes over to do what it does best: cut sideways with high precision.
For example, imagine you need to machine a large, deep pocket. You could use a center-cutting end mill12 and slowly ramp your way down to the full depth. This works, but it can be slow and puts a lot of wear on the tool. A much faster method is to use a large carbide drill bit to "drill out" the bulk of the material first. You can plunge one or more holes very quickly. After that, your end mill comes in and only has to clean up the remaining material and finish the walls of the pocket. This saves a huge amount of time and extends the life of your more expensive end mill.
Common Team-Up Strategies
Here are a few ways we advise our customers to use this teamwork.
- Pocketing: Use a drill to create a starting hole at the center of a pocket. This allows you to use a non-center-cutting end mill11l](https://nv-tool.com/what-machining-problem-are-you-solving-a-guide-to-end-mill-selection/)%%%FOOTNOTE_REF_12%%%, which is often more rigid and better for finishing.
- Slotting: For a closed slot, drill a hole at each end. Then, use an end mill to connect the two holes and clear out the material in between. This avoids the high-stress, full-width slotting15 cut for the end mill.
- Hole Interpolation: If you need a very precise or large-diameter hole that you do not have a drill for, you can use an end mill. First, drill a smaller pilot hole13. Then, use an end mill in a circular toolpath (helical interpolation17) to open the hole up to the final size. This gives you excellent control over the hole's diameter and surface finish.
Which Tool Should You Choose for Your Specific Task?
Now you know the key differences. So when you are standing in front of the machine, how do you make the final call? It comes down to one simple question about the job.
To choose the right tool, first identify the primary operation. If you need to create a simple round hole, use a drill. If you need to create any other shape, like a pocket, slot, or contoured profile, you must use an end mill.
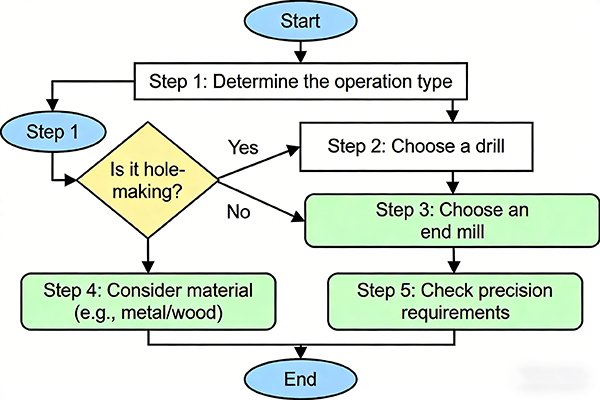
This is the most fundamental rule. Drills1 make holes. End mills2 make shapes. While there are some overlaps, like a center-cutting end mill12 plunging, sticking to their primary purpose will give you the best results 99% of the time.
At our company, NV-Tool, we manufacture a complete range of both drilling and milling solutions because we know that a modern machine shop needs both to be successful. From our high-performance solid carbide drills18 designed for rapid hole-making to our versatile solid carbide end mills9 for complex profiling, having the right tool is everything. I always tell my customers to think about the final feature they want to create on the part. The shape of that feature will tell you which tool to pick up.
A Practical Decision Guide
To make it even clearer, let's walk through a simple decision process.
-
What is my goal?
- To make a round hole of a standard size? -> Use a Carbide Drill. It's faster and more efficient.
- To make a non-round pocket or a slot? -> Use an End Mill.
- To shave material off the side of a part? -> Use an End Mill.
- To create a very large or non-standard size hole? -> Drill a pilot hole13, then use an End Mill to open it to size (interpolation).
-
What kind of end mill do I need?
- Am I starting on a solid surface? -> You must use a Center-Cutting End Mill.
- Am I starting in a pre-drilled hole? -> You can use either a Center-Cutting or a Non-Center-Cutting End Mill. The non-center-cutting version might be more rigid and better for the job.
By asking these simple questions, you can confidently select the right tool, improve your machining efficiency19, and avoid costly mistakes.
Conclusion
Choosing between a drill and an end mill is easy when you know their purpose. Drills1 are for plunging holes, and end mills are for milling shapes. Use them together for maximum efficiency.
Explore the various applications of drills to understand their importance in machining. ↩
Learn about the versatility of end mills and how they enhance machining processes. ↩
Discover how the design of tools impacts their effectiveness in different machining tasks. ↩
Explore how flute design influences chip removal and cutting efficiency. ↩
Learn about radial force and its implications for tool selection and machining efficiency. ↩
Understanding cutting forces can help you choose the right tool for your machining needs. ↩
Gain insights into axial force and its significance in tool design and application. ↩
Understanding cutting edges can help you select the right tool for specific tasks. ↩
Discover the benefits of solid carbide end mills for precision machining. ↩
Explore the key skills and knowledge required for a career in machining. ↩
Understand the limitations and uses of non-center-cutting end mills in machining. ↩
Discover the advantages of center-cutting end mills for various machining operations. ↩
Learn about the role of pilot holes in improving machining accuracy and efficiency. ↩
Explore the pocketing technique and its benefits in machining complex shapes. ↩
Learn about slotting techniques and their applications in various machining tasks. ↩
Understand the principles of CNC machining and its impact on modern manufacturing. ↩
Discover how helical interpolation can enhance precision in hole-making. ↩
Learn about the advantages of solid carbide drills for high-performance machining. ↩
Explore strategies to enhance efficiency in machining processes. ↩