
Choosing the wrong tool for slotting wastes time and ruins parts. This simple mistake costs money, but understanding the core differences ensures a perfect cut every time.
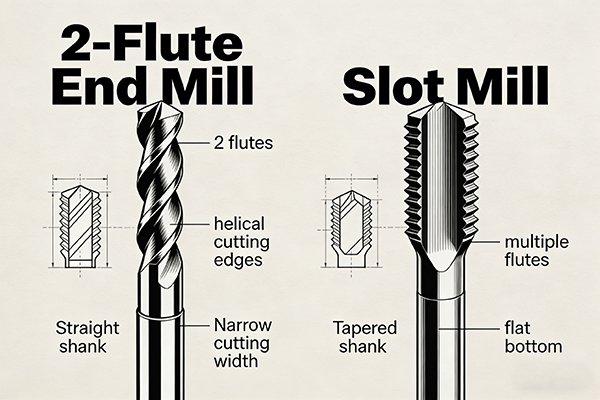
An end mill1 is a versatile tool for general milling2, contouring, and creating non-standard slots. A slot mill3 is a specialist, designed specifically for cutting precise, full-width slots4 with superior accuracy and finish. Your choice depends on whether you need flexibility or specialized perfection.
It seems simple on the surface, but the small details in design make a huge difference in performance. When I first started, I treated them the same and paid the price in scrapped parts. Let's break down exactly why one tool excels where the other might struggle. Understanding these differences will change how you approach every slotting job and save you a lot of headaches.
Why Does Chip Evacuation Dictate Your Tool Choice for Slotting?
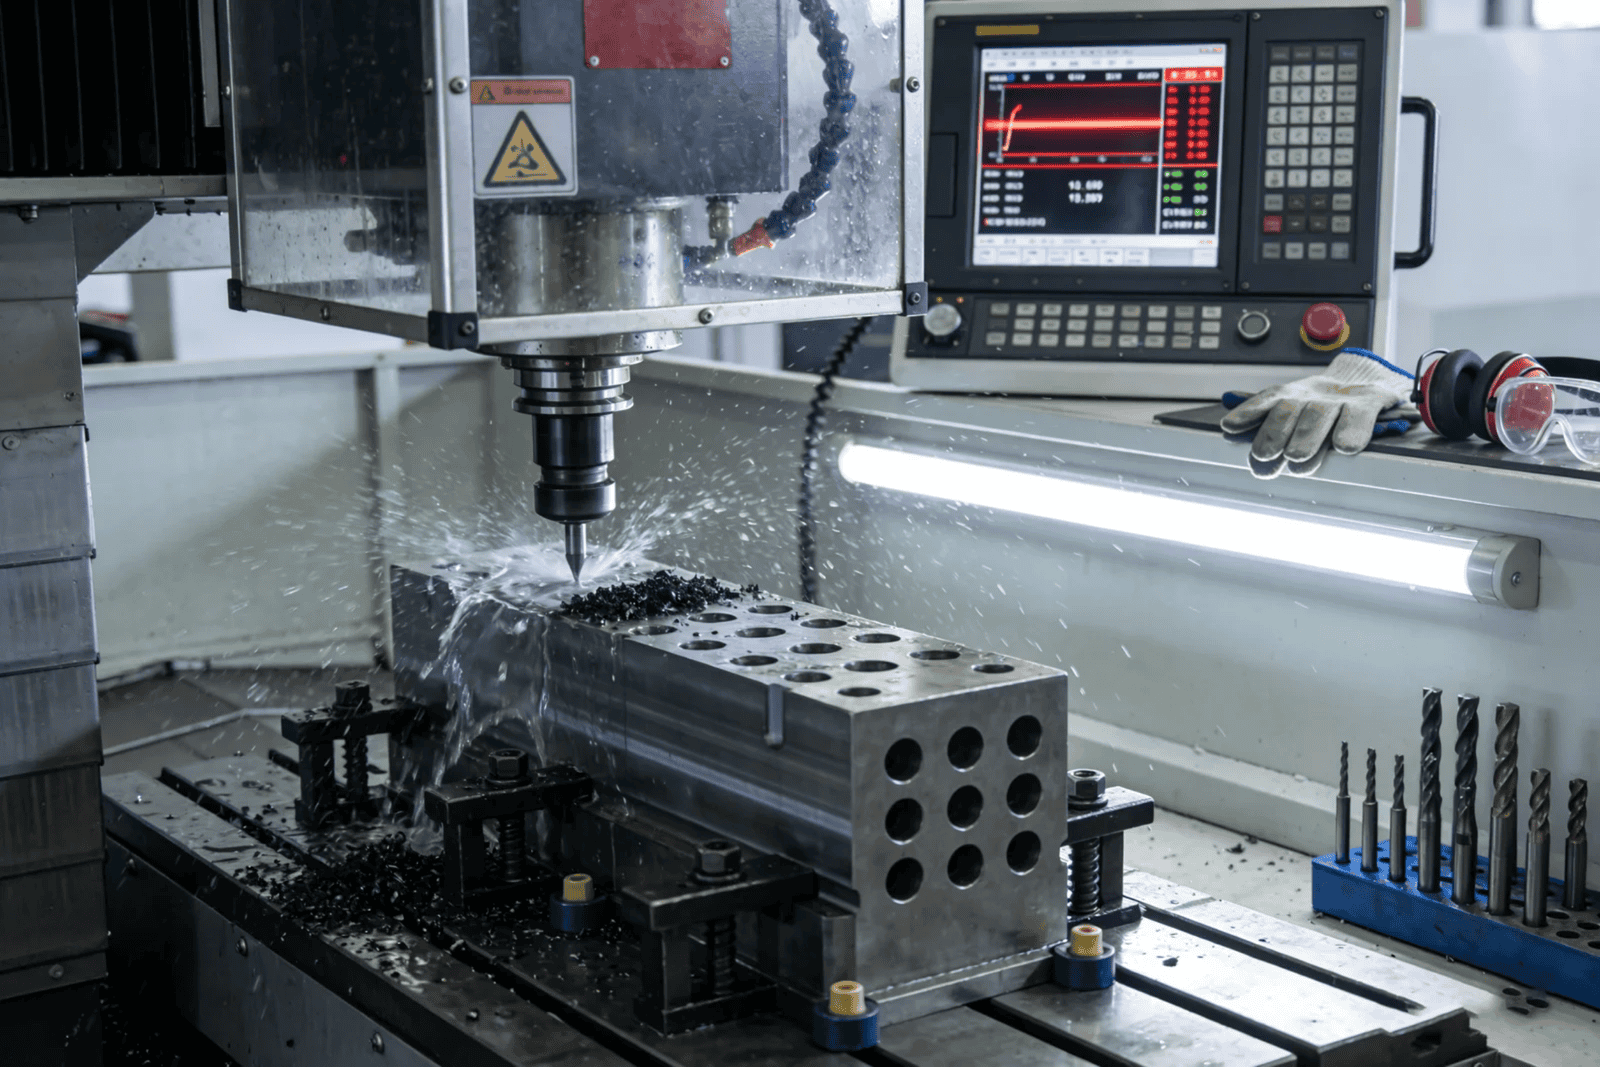
Clogged flutes cause tool breakage and scrapped parts. It's frustrating when a simple slotting job goes wrong. Choosing a tool with the right chip space5 saves these headaches.
End mills have deep, open flutes, making them great for clearing chips, especially in gummy materials like aluminum. Slot mills have shallower flutes for rigidity6, so they need high-pressure coolant7 to clear chips effectively in tight, full-width slots4 to prevent tool failure.

The design of a tool's flutes creates a fundamental trade-off between strength and chip removal. An end mill1 is designed for a variety of jobs, so having deep, spacious flutes is a priority. This allows chips to fly out easily, which is critical when you're roughing a deep pocket or working with a sticky material like aluminum. The downside is that these deep valleys create a thinner core, making the tool less rigid.
A slot mill3, however, is built for one tough job: cutting a full-width slot. This puts immense pressure on the tool. To handle it, the tool needs a thick, strong core. This means the chip flutes must be shallower, leaving very little room for chips to escape. When that tool is buried in a slot, chips have nowhere to go. That's why using a slot mill3 almost always requires high-pressure coolant7 aimed directly at the cutting zone to blast the chips out before they can get packed in, overheat, and break the tool.
| Feature | End Mill | Slot Mill |
|---|---|---|
| Flute Design | Deep and spacious | Shallow for core strength |
| Chip Evacuation | Excellent, self-clearing | Challenging, relies on coolant7 |
| Best For | Sticky materials, deep pockets | Hard materials, precision slots8 |
| Risk | Less rigidity6, potential deflection9 | Chip clogging, heat buildup |
How Does Flute Count Create a Trade-off Between Chip Space and Surface Finish?
You need a smooth finish, but your tool is chattering and leaving a bad surface. It feels like you're fighting the machine. Understanding flute count10 helps you balance finish with tool strength.
A lower flute count10, like 2 or 3 flutes on an end mill1, provides more space for chip evacuation11, ideal for roughing. A higher flute count10 of 4 or more gives a better surface finish12. Slot mills use an even number, like 2 or 4, for balanced cutting forces13 and precision.
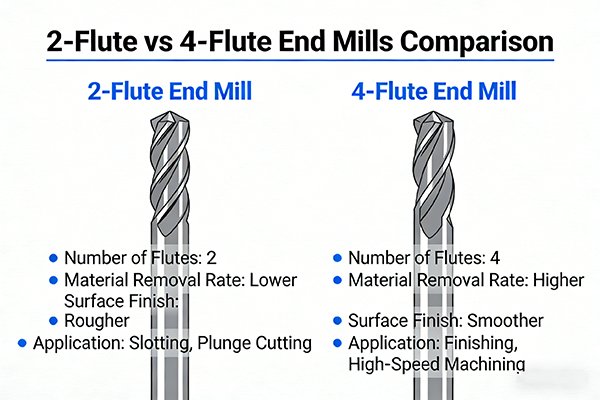
The number of flutes on a cutter directly impacts its performance. More flutes mean more cutting edges are engaged with the material per revolution, which generally leads to a smoother surface finish12. However, adding flutes means there is less space between them, making chip evacuation11 more difficult. This is the classic trade-off.
For end mill1s, the choice is application-driven:
- 2-Flute: Maximum chip space5. This is my go-to for hogging out aluminum.
- 3-Flute: A great general-purpose option that balances roughing and finishing.
- 4+ Flutes: Less chip room, but the higher number of cutting edges produces a beautiful finish on steels and other hard materials.
Slot mills are different. They almost always have an even number of flutes, typically 2 or 4. This isn't about chip space5; it's about physics. With an even number of flutes perfectly opposite each other, the radial cutting forces13 cancel each other out during a full-slot cut. This balance is what eliminates vibration and allows the tool to cut a perfectly straight, accurate slot. An end mill1 with 3 flutes would create unbalanced forces in the same cut, leading to chatter and a slot that is slightly oversized.
Can Your End Mill Plunge, or Does It Need to Ramp? The Center-Cutting Divide.
Trying to plunge with the wrong tool leads to instant failure. I learned this the hard way. Breaking a tool is expensive and stops production. Knowing if your tool is center-cutting14 prevents this costly mistake.
Most end mill1s are "center-cutting14," meaning their flutes extend to the very center of the tool face. This allows them to plunge straight down like a drill. Slot mills are not center-cutting14; they have a hole in the middle and cannot plunge. They must enter a cut from the side.
This is one of the most important functional differences between the two tools. If you flip an end mill1 over and look at the tip, you'll see the cutting edges meet in the middle. This "center-cutting14" design allows the tool to act like a drill and plunge straight into solid material. This gives it incredible flexibility. You can ramp, helix, or drill your way into a part to start a pocket or slot from anywhere on the surface.
Now, look at a slot mill3. You will see a small hole or recess right at the center. There is no cutting edge there. If you try to plunge this tool into a workpiece, the center will just rub against the material, generate a huge amount of heat, and the tool will snap almost instantly. Because of this design, a slot mill3 cannot start its own cut in the middle of a part. It must either enter the material from an open side or be fed into a pre-drilled pilot hole. This limitation is a direct trade-off for its specialized slotting performance.
How Does a Tool's Core Diameter Affect Its Rigidity and Deflection?
Tool deflection9 ruins your part's accuracy and finish. It's frustrating when dimensions are off despite a perfect program. Choosing a tool with a thicker core is the best way to minimize deflection9.
Rigidity is key to precision. Slot mills are designed with a thicker core diameter and shallower flutes. This makes them much more rigid than end mill1s of the same size, allowing them to resist bending forces during full-width slotting and produce perfectly straight walls.
Think of the core of the tool as its backbone. A thicker core makes the tool exponentially stronger and more resistant to bending, or "deflection9." When a tool deflects even a tiny amount, it results in inaccurate dimensions, poor surface finish12, and chatter.
Here’s how the two tools compare:
- End Mill: To get those big, deep flutes for chip evacuation11, some core diameter has to be sacrificed. This makes the tool more flexible and prone to deflection9, especially when the tool has a long reach. We often have to take lighter cuts to compensate for this.
- Slot Mill: This tool prioritizes rigidity6 above all else. It is designed with the thickest possible core. This strength, combined with a typically shorter cutting length, makes it incredibly stiff. It's built specifically to withstand the heavy side loads encountered when cutting a slot in a single pass. This is the secret to how it produces slots with dead-on width and straightness. Less deflection9 means the tool cuts exactly where you tell it to, every time.
What is Your Primary Mission: Aggressive Slotting, Fine Finishing, or All-Around Versatility?
Using a specialized tool for a general job is inefficient. It slows you down and can wear out expensive, specialized tools15. Matching the tool to the specific mission is how you maximize performance and profit.
For versatility—contouring, pocketing16, and general milling2—the end mill1 is your go-to tool. For the single, dedicated mission of creating a precise, full-width slot with perfect walls and an excellent finish, the slot mill3 is the undisputed specialist.
At the end of the day, the right choice comes down to the job at hand. You have to ask yourself what you're trying to accomplish. In our shop, we think of it in terms of the tool's "mission."
-
Mission: Versatility. If I need to make a part with pockets, contours, and maybe a few odd-sized slots, the end mill1 is the clear winner. It's the multi-tool of milling cutters. Its ability to plunge, ramp, and side mill makes it incredibly flexible. One good end mill1 can perform dozens of different operations, saving tool-change time and simplifying programming.
-
Mission: Precision Slotting. If the drawing calls for a keyway, a groove for a retaining ring, or any slot with a tight tolerance on its width and straightness, I don't even think twice. I grab a slot mill3. It is designed for this one purpose, and it will outperform an end mill1 every single time. The balanced forces and high rigidity6 guarantee a perfect slot, often in a single pass, saving time and ensuring the part is in spec. Trying to achieve the same result with an end mill1 would require multiple finish passes and much more careful work.
Conclusion
Choosing the right tool is simple: use an end mill1 for versatility and a slot mill3 for dedicated, high-precision slotting. This decision improves accuracy, speed, and your bottom line.
Explore the versatility of end mills and how they can enhance your machining projects. ↩
Learn about the various applications of general milling and the tools best suited for it. ↩
Learn about the specialized design of slot mills for precision cutting and their unique advantages. ↩
Understand the significance of full-width slots in various machining applications. ↩
Learn about the significance of chip space in maintaining tool performance during operations. ↩
Find out why tool rigidity is essential for achieving precise cuts and preventing deflection. ↩
Explore the importance of coolant in chip removal and tool cooling during machining. ↩
Explore the techniques and tools used to achieve high-precision slots in machining. ↩
Learn about the factors contributing to tool deflection and strategies to reduce it. ↩
Understand the trade-offs between flute count and surface finish quality in milling tools. ↩
Understand the critical role of chip evacuation in preventing tool failure and ensuring quality cuts. ↩
Discover the key elements that contribute to achieving a smooth surface finish. ↩
Learn about the impact of cutting forces on tool stability and machining accuracy. ↩
Discover the advantages of center-cutting tools for versatile machining applications. ↩
Explore how specialized tools can enhance efficiency and precision in machining tasks. ↩
Understand the process of pocketing and the tools required for effective execution. ↩